If you want to play fingerstyle or classical ukulele then you will need to have some understanding of how the music is written because, invariably, it will be written down. The good news is that you don’t have to be able to read music notation. Ukulele sheet music is almost always written in notation and tab (tablature).
You may already have bought a couple of classical ukulele books or downloaded some PDFs, or you may have signed up to a workshop on classical ukulele. Or you may just be curious about playing something different on your ukulele. Whatever your skill level, or interest, the first step is understanding how the score is laid out.
This blog will look at some of the essential elements of a ukulele score. While there are different formats and approaches, depending on the composer / arranger and what music software (if any) has been used, there are some guidelines which I’ll cover here.
Below is a typical example of a piece I use in my workshops. It shows a simple melodic line in notation and tab, with (optional) chord charts at the top.
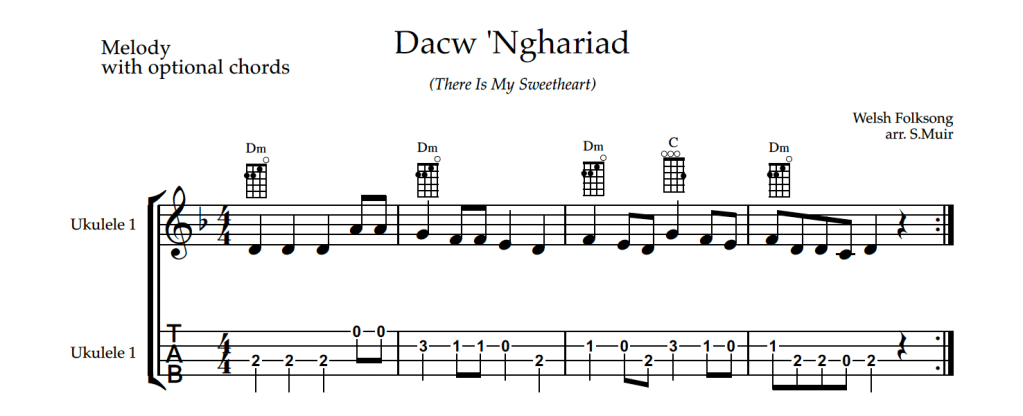
The following provides a breakdown of the different components:
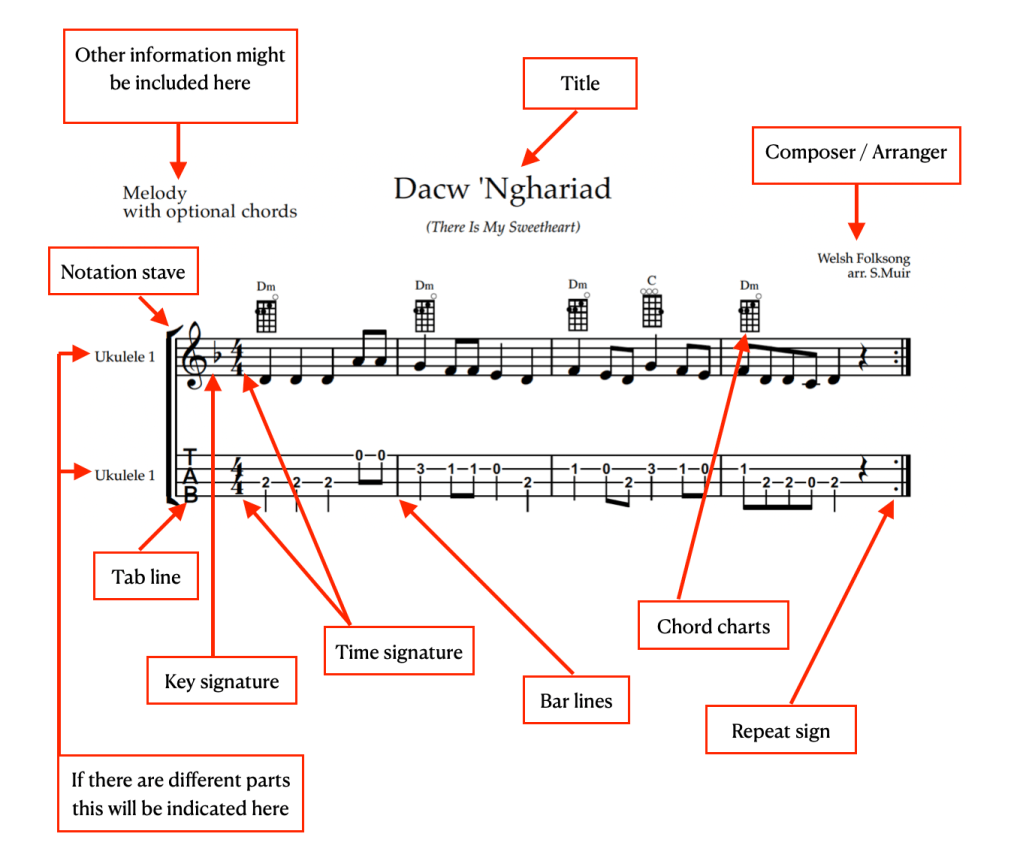
The title of the piece always appears at the top, in the middle. In this instance, as the title is Welsh an English translation is provided underneath.
The name of the composer or arranger, or some equivalent information such as “Welsh Folksong” is placed on the right above the notation line.
Other information might be included on the left hand side of the page. For example, as this particular piece is for more than one ukulele it includes the detail ~ “Melody with optional chords”. The chords, if played, are played by another ukulele and are shown above the notation.
Each stave has the words “Ukulele 1”. This is a further indication of the part and the fact that the player can use either the notation or the tab. It also helps to identify each player’s role. For example, if the full score involved a second part this would be indicated by “Ukulele 2”.
The two staves are connected by a thick black line and a thin line ~ one stave for the notation and the other for the tab. The tab is indicated by the vertical letters TAB. The notation stave is indicated by the treble clef. The player can either use the notation or the tab. They are not expected to also play the chords ~ these are for another player.
The key signature is only included on the notation line and is placed just after the treble clef.
Both staves contain a time signature. In this piece the time signature is 4/4.
The vertical lines that divide the music into bars are called, unsurprisingly, a bar lines.
A double bar line signifies the end of the piece. In both examples the double bar lines have 2 dots on the left hand side ~ this indicates the piece is repeated from the start. If only a particular section of the piece is meant to be repeated this is indicated by two sets of double bar lines both of which have 2 dots (see below). Dots on the left indicate the end, and dots on the right, as in the example below, indicate where the repeat starts:
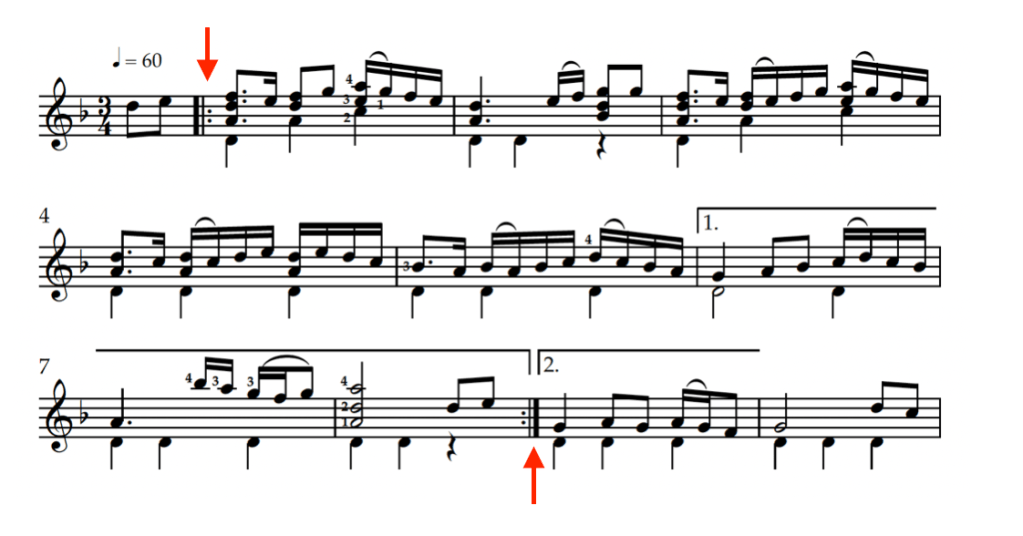
You may have noticed the line over bars 6, 7, 8 and 9 with either the number 1 or 2. The line with 1 indicates these bars are played the first time through. On the repeat these bars are not played. The player jumps, at the end of bar 5, to the second time bar which is indicated by a line with the number 2.
Repeats, and first and second time bars are a kind of musical shortcut to avoid writing everything out twice. There are other symbols too but I won’t go into them here.
Another kind of musical shorthand, worth mentioning, is the da capo al fine which on the music is abbreviated to D.C. al fine. You see this at the end (although it’s not actually THE END) of a piece. It means go back to the beginning and play until you come to the word Fine. Which is not like fine, whatever! It’s Italian for finish.
Other indications which you might see on a typical ukulele score are fingerings and strings indicators.
Fretting hand fingers are identified by numbers: 1 = index finger; 2 = middle finger; 3 = ring finger & 4 = little finger, or pinky. Have a look at bar 7 in the above example and you will see the numbers 3 and 4 alongside the notes. Fretting hand fingers are usually placed in the notation stave. Placing numbers in the tab line is just way too many numbers and really confusing!
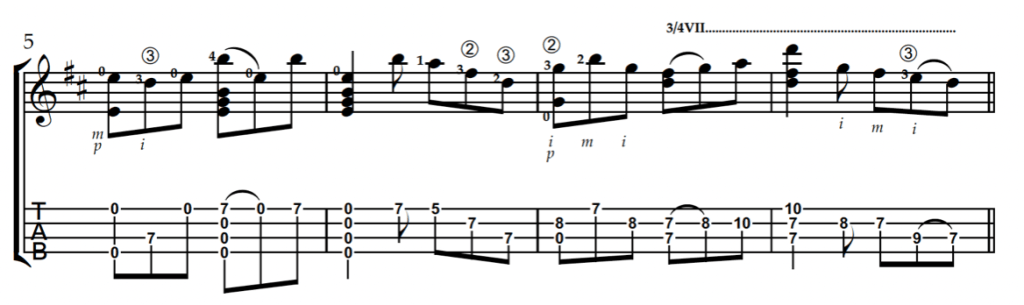
3/4BIII means hold down a 3 string bar at the 3rd fret. Let’s break that down. The 3/4 means 3 of the 4 strings are barred. The B means barre, or bar. The Roman numerals III are for 3rd fret. The dotted line tells you how long to hold the barre. So, 1/2BV would mean a half barre (2 strings) at the 5th fret. A full barre is just indicated as B and then the relevant fret.
Sometimes you see a number placed inside a circle and this indicates the string. Once again this only applies to the notation as the tab is self explanatory! In the example above the D is played on the 3rd string (in baritone tuning).
Picking hand fingers are indicated by the letters i = index; m = middle; a =ring finger; p = thumb. The letters come from the Spanish words for the fingers and it’s a tradition handed down from classical guitar.
All fingering is attached to the notation line. With a tab line underneath you don’t really need the fingering as it is immediately apparent where each note is situated. To my mind the visualisation of the strings also makes the picking hand fingering intuitive.
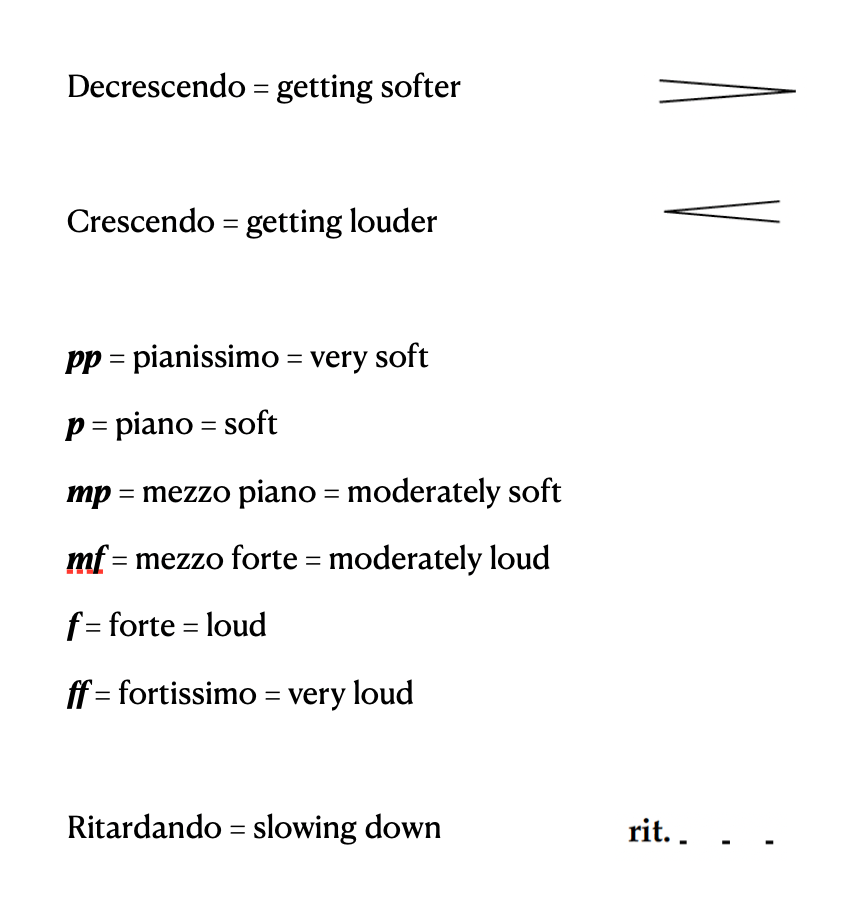
A score will often include dynamic markings. Here are some basic examples:
There are lots of other indicators that may be included in a score but this should be enough to get you started.
If you are a composer or arranger and are interested in learning more about score layout then I recommend Behind Bars: the definitive guide to music notation by Elaine Gould.
