This is the transcript for the YouTube video tutorial. The video includes practical examples and a couple of bloopers 🤯.
In this tutorial we’re going to explore how to play campanella on the ukulele. Using a practical example I’ll explain how this technique works and demonstrate why campanella is such a beautiful, albeit often complex and mind bending, approach to playing the ukulele. As we’ll see campanella is technically challenging and requires careful consideration of the fingerings for both hands. The beauty of campanella is that by using over-ringing effects we can create a subtle interplay of intervals and compensate for the ukulele’s lack of bass. Campanella also allows us to play intricate and beautiful solo pieces ranging from works by Bach to traditional Irish and Scottish tunes.
Firstly, what does campanella mean and why do we use this word to describe a musical effect?
Campanella is an Italian word meaning ‘little bell’. It was originally used by Baroque guitar composers, such as Gaspar Sanz (1640 – 1710), to describe the over-ringing effects created when melodic notes are placed on alternating strings. We’ll explore this in more detail later.
Like the ukulele, the Baroque guitar uses re-entrant tuning, thus making these instruments the ideal canvas for campanella playing. But what do we mean by re-entrant tuning and why is this important? Let’s start by looking at the standard tuning of the ukulele (gCEA). The A string (the string closest to my feet) is the highest string. The E string is a 4th lower and the C string is a 3rd lower than the E. If that pattern of descending open strings were to continue, the G string would sound a 4th lower than the C (as it does if you use a low G tuning). But, in standard ukulele tuning, the 4th string (the string closest to your chin) sounds a 5th higher than the C string. Thus, the open G is tuned an octave higher than we might expect and is said to be re-entered. Over time the guitar has become a linear tuned instrument with all of the open strings descending in pitch from the 1st string (highest = feet) to the 6th (lowest = chin). While it is still possible to play campanellas on a linear tuned instrument (like the modern guitar), re-entrant tunings extend the possibilities – giving us a greater creative palette to use in our arrangements and compositions. As we’ll soon see, with re-entrant tuning I can use all four strings to play a melody, thus adding resonance and depth to my music.
Before we learn how to play a scale in campanella style here’s a little bit of background on playing campanella on the ukulele.
In the 1990s John King championed the campanella style on the ukulele. His campanella arrangements and recordings of works by composers such as Bach helped to elevate the status of the ukulele. His most famous book is The Classical Ukulele, published by Flea Market Music in 2004. This book and its accompanying CD feature many of King’s campanella arrangements. A defining feature of King’s approach was that he applied campanella technique to entire pieces. This was quite a different approach to the Baroque guitar composers who had only used it as a novelty device to highlight certain passages.
I have used campanella in many of my arrangements and compositions. I was, in fact, one of the first people to use campanella in original works for the ukulele. Having said that I would like to mention the works of Ernest Ka’ai (1881 – 1962) – the first Hawaiian ukulele virtuoso (Ukulele Hall of Fame Museum website). While Ka’ai never intentionally used campanella as a compositional device he did intentionally create over-ringing effects in many of his pieces (see Haere, Banjo Schottische, and El Recuerdo).
Okay! Let’s explore how campanella works. I’m going to use the D natural minor scale to demonstrate this technique. Before we get into the campanella version let’s play through the scale starting in first position. In this version the notes are ascending in a step by step motion across the fingerboard. As I play through the scale listen to how each note is clearly defined and sounds as an individual entity.
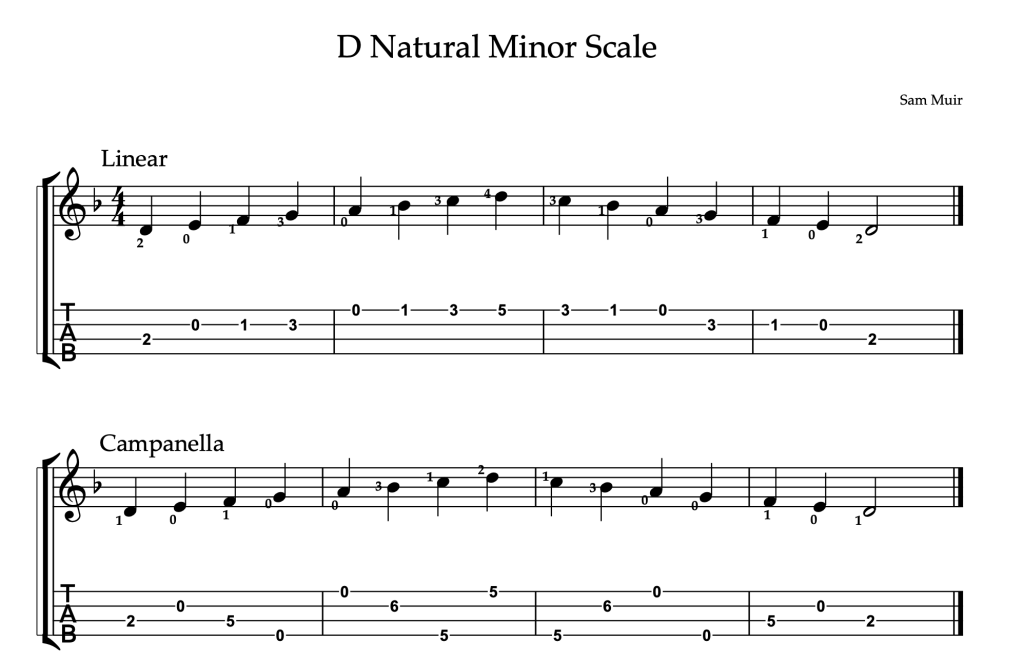
When I play through the same scale in campanella style listen to how the notes, while still ascending and descending, are now able to ring on and over each other in order to create as much over-lapping of sound as possible. Let’s explore how this is achieved by breaking down the scale and playing slowly through the notes.
Note: the fretting hand fingering is critical (we’ll worry about the picking hand later), as is the holding and releasing of notes.
I begin with my 1st finger on D. When I play the next note – the open E – I continue to hold the D so the sound will ring on and over the E. In order to create a campanella effect with the open E, next note F is played on the C string at the 5th fret. I could play this note by stretching up with my 4th finger but I’m going to slide my 1st finger up to the 5th fret ready to play the next notes. When I slide from D to F with my 1st finger I release the pressure on the string and use the string as a tram line to guide my finger up the fingerboard. By keeping the finger in contact with the string my shift is more accurate and efficient than if I remove and then replace the finger.
Before we continue let’s take a moment to think about which notes are over-ringing and the resulting effects. At the start of the scale we held the tonic D as we played the following open E, thus creating the interval of a major 2nd. The over-ringing here is quite minimal but when I shift up to the 5th fret to play the F, I now have the open E over-lapping with the F. The resulting interval of a minor 2nd, or semitone, creates a little spine tingling dissonance. The next note – G – is played as an open 4th string. So, now I have the sound of the open E (0,2)*, the 5th fret F (5,3), and open G (0,4) all over-lapping. The strings in motion are 2, 3 & 4.
* Using Jonathan De Souza’s model the fret number is given first and then the string number.
The over-ringing intervals are:
E to F = minor 2nd
F to G = major 2nd
E to G = minor 3rd
When I add the next note – A – to the mix I have all 4 strings in motion and all the notes are ringing on. At this point my ukulele is really humming with interesting sounds.
The intervals are now:
E to F = minor 2nd
F to G = major 2nd
G to A = major 2nd
E to G = minor 3rd
E to A = perfect 4th
F to A = major 2nd
That’s quite a wash of sound. I often think campanella is like an impressionist painting. Rather than the specific, clearly defined lines of a scale or melody in stepwise motion, campanella technique produces subtle shades of colour which collectively create a beautiful and evocative soundscape.
Moving on with our scale – our next note is Bb. This is played at the 6th fret of the E string (6,2). I’m going to use my 3rd finger. When I place my finger on the string, any residue of the open E is stopped but the open A and Bb create another spark of that haunting minor 2nd interval.
Note that my 1st finger stays in place as I play the C on the 5th fret of the 4th string (5,4) and my 2nd finger stays on the high D at the 5th fret of the 1st string (5,1). All 3 fingers are held in position in what is basically an extended G major shape. This not only maximises the over-ringing effect, it facilitates an easy transition into the descent as D (5,1) falls to C (5,4) and C falls to Bb (6,2). Let’s see how this works.
Only when I play the open A (0,1) do I release the 2nd finger (5,1). I then release my 1st finger to play the open G (0,4). Note that the 3rd finger is still holding down the Bb (6,2). The next note is F (5,3) and I’m going to use my 1st finger to play this note. Only at this point do I release the 3rd finger (6,2) so that I can play the open E (0,2). Finally, as I play the open E (0,2) I glide my 1st finger back to the D on the 2nd fret of the C (2,3) string to complete my scale.
As you can see playing campanella style requires careful consideration of when to hold a note and when to release a note.
The other thing to consider when playing in campanella style is that the fretting fingers need to be placed very precisely so they don’t interfere with the other strings. Remember that the goal is to have as many strings in motion as possible. To achieve this make sure the fretting fingers are not touching (and therefore stopping) the sound of the other strings. By allowing the strings to over-ring I create a subtle interplay of consonance and dissonance – major and minor 2nds, major and minor 3rds, perfect 4ths.
One final question we need to address is what is the difference between campanellas and arpeggios?
Both techniques create over-ringing effects but while campanellas are melodic, arpeggios are harmonic. In other words arpeggios create over-ringing by breaking the notes of a chord and campanellas do this by moving the notes of a melody across the strings to create over-ringing effects reminiscent of little bells.
Arpeggio example

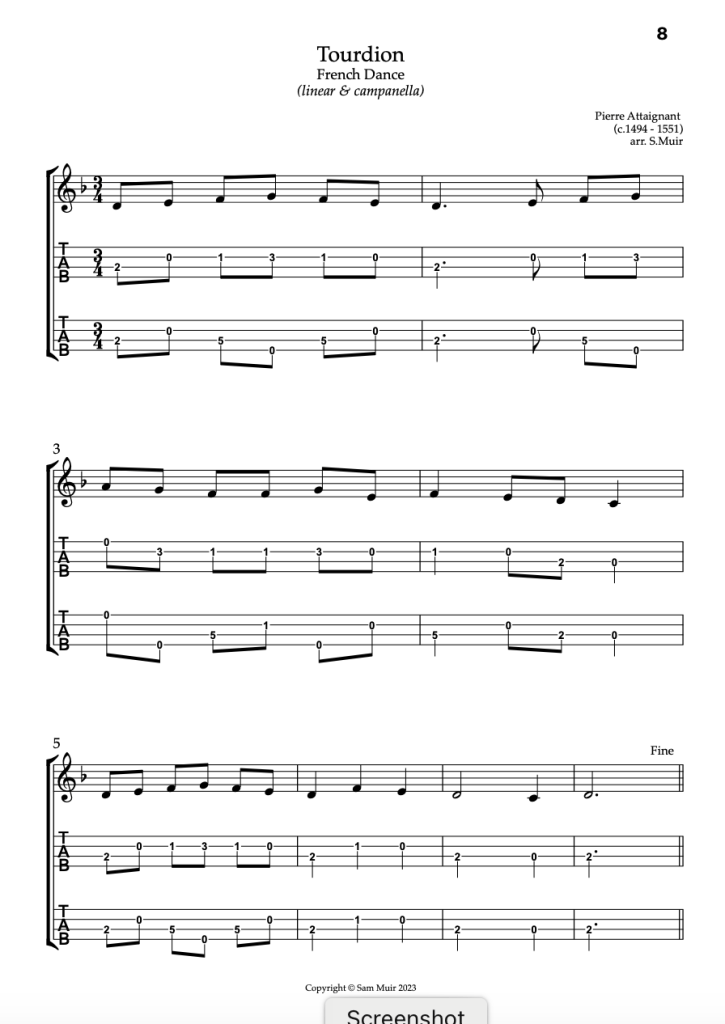
Campanella example – the 1st line shows the notation; the 2nd shows how the notes can be played in 1st position (non-campanella); and the 3rd line shows the notes played in campanella style.
Thanks for reading/watching this tutorial. I hope it will serve as an introduction to how campanella works on the ukulele and inspire you play, compose and/or arrange your own campanella pieces. Let me know if you have any questions. More of my video tutorials, Zoom workshops and arrangements/compositions can be accessed through my Patreon subscription site. CLICK HERE to be redirected to my Patreon.

Thanks.
LikeLiked by 1 person