
© Josie Elias 2018
Brian Boru’s March is a traditional Irish tune which has long been a favourite of harp players. Brian Boru was High King of Ireland from 1002 – 1014 AD. He united the tribes of Ireland against the invading Vikings but, unfortunately, was assassinated by a rogue Viking while celebrating one of his greatest victories. It is uncertain whether Brian Boru played the harp but he was a patron of harpers and poets. Today, Ireland’s national emblem is the harp. It is based on the Brian Boru harp, or Trinity harp, which is housed in the Long Room of Trinity College, Dublin. Although legend tells that this is the harp played by Brian Boru before the battle of Clontarf in 1014, the harp is from the 14th or 15th century.
The tune is in 2 sections. The 1st section is arranged in chord / melody style and the 2nd section is arranged in campanella style. Literally meaning “little bells” campanella is a technique that places the melodic notes on different strings. The over-ringing of the notes creates a harp like effect. A favourite technique of Baroque guitarists, campanella style is popular with many ukulele players today. The ukulele, with its re-entrant high G fourth string, makes it a perfect instrument for playing campanella melodies. Before we look at playing the tune let’s take a closer look at campanella technique.
Campanellas should not be confused with arpeggios.
To play a D minor arpeggio
Step 1: grab your ukes and make a D minor chord shape:
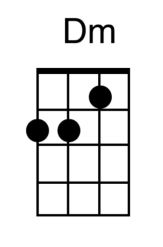
Step 2: Instead of strumming the chord, play it one note at a time. Refer to Ex.A below. Play across all the strings (slowly) from the 4th string (closest to your chin) to the 1st (closest to your feet). The notes you are playing are A D F A (see Ex. A). This is a D minor arpeggio.

Ex.B shows the arpeggio starting with the tonic note (D), followed by the 3rd (F) and the 5th (A) degrees of the chord. D F A
How to play a campanella
Step 1: Let’s start with the D natural minor scale. Note that we are now talking about the scale rather than the chord. Arpeggios are associated with chords while campanulas are associated with scales. The notes of the D minor natural scale are D E F G A Bb C D. In the 1st example below the scale is played in a linear way, ascending and then descending. Use the tab to find the positions of the notes.
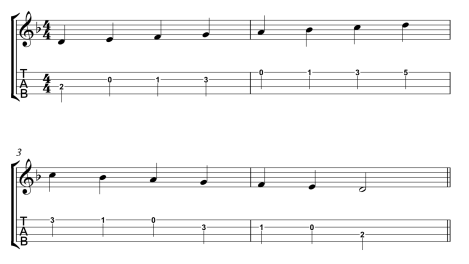
Step 2: Now, in the next example the scale is played as a campanella with each note placed on a different string. Once again refer to the tab for the placement of the notes.

In the campanella version the notes ring on and over each other creating some interesting nuances. Casting your eye over the tab will show the seemingly haphazard placement of the notes across the strings. While they sound beautiful, campanellas can be frustratingly counter-intuitive! They are like little parallel universes of sound.
Have a listen: (there’s also a tutorial video at the bottom of the page.)
Before analysing the tune I recommend you download the sheet music and print it out. Click on the blue links below to download the full version and the melody version.
Click here to download Brian Boru’s March Full version
Click here to download Brian Boru’s March Melody version
A final word before we start. The right hand fingering indicators are as follows:
i = index finger
m = middle finger
a = ring finger
p = thumb
Part 1
Part 1 is made up of 2 x 4 bar phrases. Each phrase can be further reduced to 2 x 2 bars. Breaking a piece down into phrases and sub-phrases is a good way to practise. I recommend focusing on small parts rather than trying to learn the entire piece at once. This method aids memorisation.
The 1st two bars are in the tonic key of D minor. We start with an open A upbeat which leads to a D minor chord. I’ve included chord charts in this section as a guide to the chord shapes. If you are new to tab, groups of numbers can look intimidating, but as you become more confident you will recognise the chord shapes and not need to read every note. For now refer to the chord charts above the notation to help you get started.
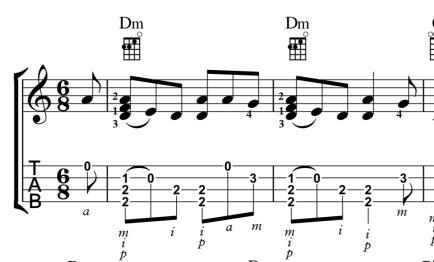
Rather than playing a full chord I’ve chosen to play 3 notes together using thumb (p), index (i) and middle (m) fingers. The melody notes are usually the highest notes of the chord. Make sure you bring out the melody. The other notes are the harmony notes which help to fill-out the tune and act as an accompaniment.
Here’s the same 2 bars with just the melody. I recommend you use this to get a sense of the melody. Hearing the melody in your head is an essential part (art!) of playing chord / melody arrangements.

We should probably talk about the slurs…
Slurs are the little curved lines that connect 2 notes. There are 2 types of slurs: the hammer-on and the pull-off. Bars 1 and 2 both use the pull-off. This is when you pluck the higher note with the right hand and then create the 2nd, lower note, by pulling the left hand finger off the 1st note. In this instance play the 1st fret F and pull the left hand finger off the string to make the open E sound. The left hand finger acts like it is plucking the string – while the right hand gets a short holiday! I often tell students to think pluck and pull in order to help the co-ordination. This technique can be confusing at first but once you get the hang of it you can use it in lots of pieces. A common mistake is just lifting the left hand finger straight up. Try a slight downwards pull as you will only need a small movement to make the note sound. Another common mistake is to try and execute (literally!) the pull-off too quickly or erratically. Remember to maintain the rhythm. The pull-off needs to be in time. Don’t expect the pull-off to sound as clear as a plucked note. It is an ornament and should sound like a little sigh.
I’ll talk about the hammer-on in a minute…
The musically astute will be wondering: what is the difference between a slur and a tie? Both are indicated in the music with little curved lines. Ties link 2 identical notes and act as a rhythmical value. Slurs link 2 notes, usually a step apart, and are ornaments.
Bar 2 is similar to bar 1 but with a rhythmic variation on the 4th beat. The flow of quaver beats is interrupted by the crotchet. This musical pause creates a natural break in the music and is the end of the first sub-phrase.
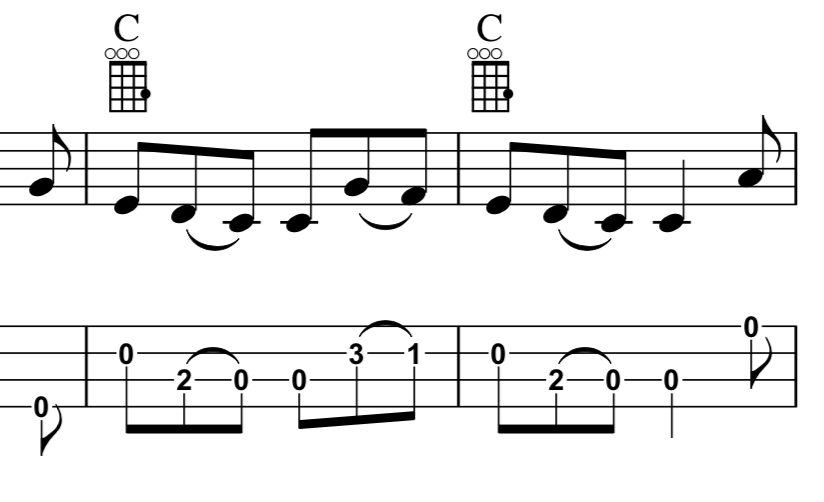
The next two bars of the phrase are in C major. Remember that the phrase actually begins on the quaver upbeat of Bar 2. The major chord suggests a lighter mood but the rhythmic momentum is maintained. The pull-offs in bar 3 are tricky and may need a bit of slow, focused practise. Make sure the pull-off’s are even and played as quavers. In order for the pull-off from 3 to 1 to work you’ll need to have both fingers planted. If you’re having trouble with the slurs try playing the bar really slowly in time but plucking each note. i.e. without the pull-off’s. Once you have got the rhythm in your head re-introduce the pull-off’s.
Here are bars 3 and 4 with the upbeat from bar 2:

Here is just the melody for bars 3 and 4:
Bars 5 and 6 are the same as bars 1 and 2. (see above)
Bars 7 and 8 offer a nice harmonic contrast with Bb major and A major chords. The 2 major chords give a dramatic touch before returning to the tonic key of D minor to end the section. The A major chord has an arrow to indicate a fast, downward strum. I’ve suggested using the thumb but it also works using the back of the index finger nail.

Here is the melody for bars 7 and 8. Please note: I’ve put the G on beat 6 as an open 4th string as it seems like an easier option.
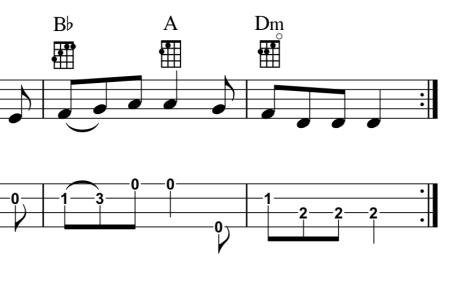
Note also the hammer-on at the beginning of the bar. This time you play the lower note and then hammer the left hand finger onto the 3rd fret G to create the note. You don’t need a sledge hammer swing! You need to be fast and accurate. Think Bruce Lee not King Kong. Make sure the finger lands cleanly – not on the fret.
Part 2
In part 2 there is a change of mood and a change of key. The tune modulates to the relative major of F. The mood is reflective and there are no dramatic rhythmic pauses just a constant flow of quavers. I’ve changed the arranging style from chord / melody to campanella to compliment the mood. The melody makes a perfect campanella. Just cast your eye over the tab and you’ll see how the notes move beautifully across the strings!
Bars 9 and 10 are in F major. Notice how the last 3 notes of bar 9 create a wonderful dissonant shimmer of A Bb A. Hold on to the Bb to get the full beauty of that effect! The right hand fingering is an essential important part of campanella playing. I’ve written in a suggested fingering to het you started but feel free to change it to suit your hand.

Here’s the melody not as a campanella: (these are the same bars although the 9 is slightly misleading!)

Bars 11 and 12 are in C major. The 5th fret note on beat 2 is held over from the previous bar so just keep the 4th finger down and then use finger 2 for the 2nd fret note – as marked in the score. Bar 12 ends with a delayed pull-off. The 2nd finger doesn’t pull-off until the 5th fret F has been played. This is optional. You could just as easily play the open E.

The melody for bars 11 and 12 simplified:

Bars 13 and 14 are musically the same as bars 10 and 11 but I have made a slight change to the campanella in bar 13. I’ve moved the A to open string in bar 13. Part of reason being to give you an alternate way of playing that bar. Feel free to use whichever fingering works best for you. I do play those bars as written as I like the subtle difference created by the open A. It’s a small detail but something to think about.

Bar 15 has 2 strummed A major chords. Strumming the full chord on both beats breaks the flow of quavers and adds a nice dramatic effect. You can strum these chords either with the side of thumb, which gives a more mellow sound, or with the back of the nail of the index finger, which gives a more strident tone. I use both methods – depending on the moment. Be spontaneous! Bar 16 returns to the tonic key of D minor.
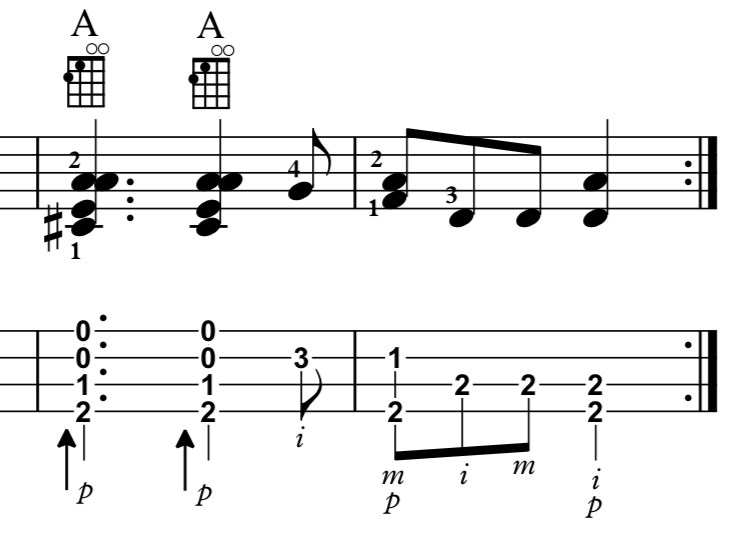
Bars 15 and 16 as just melody:

Although the piece is in AB form I like to play the 1st section as a da capo. i.e. finish the piece by playing the 1st section once, so A B A. But it’s up to you!
This piece was originally published in UKE Magazine in 2016. Here is a video tutorial with the piece played at tempo and then slowly (and me looking manic!)
Please note: I spend a lot of time and effort writing these tutorials. If you find a mistake, or a typo, please forgive me and do let me know. This work is my copyright and intended for users of this site and the related Facebook group. Members of the group can post videos and get feedback. Thank you!


Love this Tune and Tutorial. Thank You. I’m going to ” give it a go ” as soon as I’ve had my breakfast.
LikeLike
Thanks Sylvia. Do you know that your email address shows as your username?
LikeLike
Hi Samantha, Yes it’s ok. My daughter hosts that email box. I use it for ” specials ” that I don’t want to get lost in my other boxes. Just found the donate button. Havn’t seen that before. : ) Must admit I didn’t see this column either. Groan, I do miss things sometime. Still working on Brian B’s March.
LikeLike
And your strum arrows are going from feet to chin ?
LikeLike
The strums arrow are from chin to feet, or from 4th string to 1st string following the direction of the tab.
LikeLike
I really like having the right hand fingering indicators.
Also, I like seeing the lesson broken down into two-measure units. I know a new piece should be approached this way, but I often do not. Having the lesson parsed out into smaller chunks encourages me to practice the way I know I’m supposed to.
Thank you for sharing…great selection…reminds me of the soundtrack from “Last of the Mohichans”…
LikeLike
P.S. – Please add a “DONATE” button to this website!!
LikeLike
Thanks Martin! OK, now I’ve worked out how to add a donate button 🙂
LikeLike
What you are doing is GREAT!. Please keep up. It takes our little instrument to a whole new level. Thanks
LikeLiked by 1 person
Thank you!
LikeLike
Thanks for posting, I’m really enjoying learning these. I’ve got the first 8 bars but very slow. Same with Rakes of Mallow, I just can’t get near your speed yet! Etude in A minor was slow enough for me to crack it! I’ll keep on practicing.
LikeLiked by 1 person
Thanks Chris!
LikeLike
Thanks Sam for posting this. I have ben ‘marching with Brian’ for the last week and it is coming together. almost marching in step. Appreciate all the work you do for these tutorials.
LikeLiked by 1 person
Thank you Mikala! I’m glad you find the tutorials useful! 🙂
LikeLike
Your recording of the Dm linear vs Campanella scale really brings home the beauty of this style and is inspiring me to get to grips with it, thanks. I’ve realised that a correctly adjusted strap is essential (for me at least)to be able to float around the fretboard.
Quick question: have you got some really fancy microphone or is it just a beautiful acoustic coupled with a very good uke?
LikeLiked by 1 person
Hi Ruth, it’s a combination of a good uke, a good acoustic and a Roland RH 90 digital recorder. It’s not really fancy but effective.
LikeLiked by 1 person